Integration
StakeWise documentation: https://docs.stakewise.io/
-
Installing StakeWise client
-
Find the latest stable version of StakeWise client on Github
- Find latest StakeWise version at https://github.com/stakewise/v3-operator/releases
- Write latest stable StakeWise version:
This will update the url links in the guide below.
-
Download the binary file for your node
What's you Ubuntu version?
cd ~/downloads && curl -LO https://github.com/stakewise/v3-operator/releases/download/v4.1.10/operator-v4.1.10-ubuntu-24.04-amd64.tar.gz -
Unpack the client and remove its packed file
tar xvf operator-v4.1.10-ubuntu-24.04-amd64.tar.gz && rm operator-v4.1.10-ubuntu-24.04-amd64.tar.gz -
Move the client to
/usr/local/binsudo cp ~/downloads/operator-v4.1.10-ubuntu-24.04-amd64/operator /usr/local/bin/stakewise-operator -
Remove downloaded files
rm -r ~/downloads/operator-v4.1.10-ubuntu-24.04-amd64
-
Add Stakewise operator
StakeWise Operator is a middleware that connects staked GNO in selected StakeWise Vault with actual validator keys connected to the same Vault. StakeWise operator doesn’t replace a validator client and as so, there's still required to to run standard validator client with the validator keystores simultaneously to perform validator duties.
StakeWise documentation: https://docs.stakewise.io/
-
Creating a StakeWise Vault
You must have a deployed Vault. You can create a new Vault or use an existing one.
- At https://app.stakewise.io/operate, connect your wallet and create a new (or select your existing) Vault
- Process vault setup step by step.
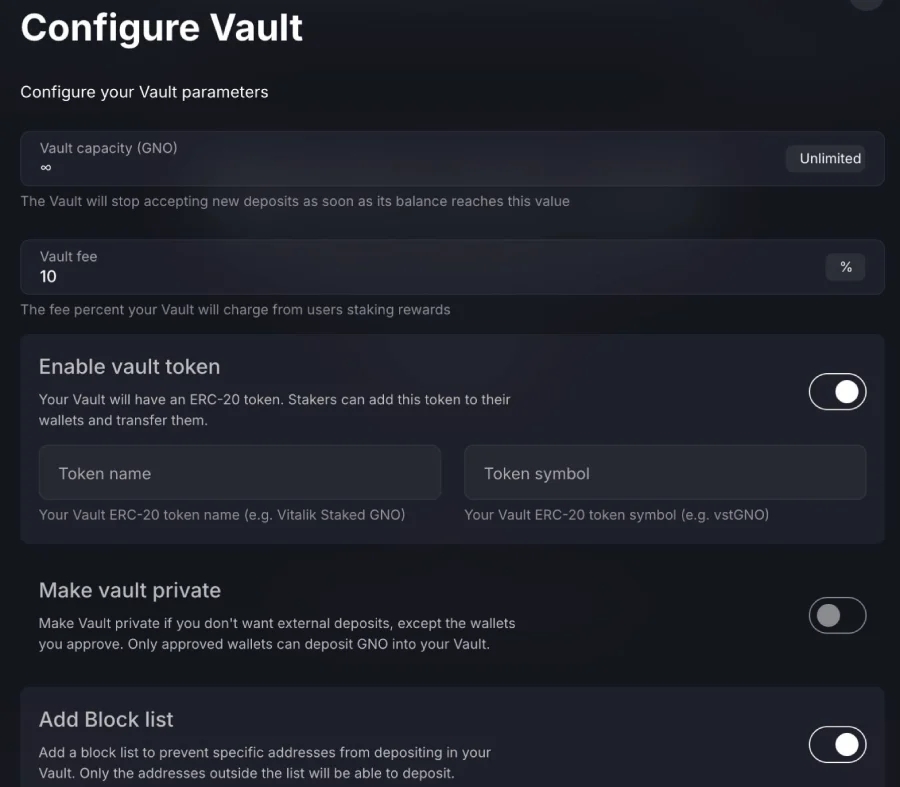
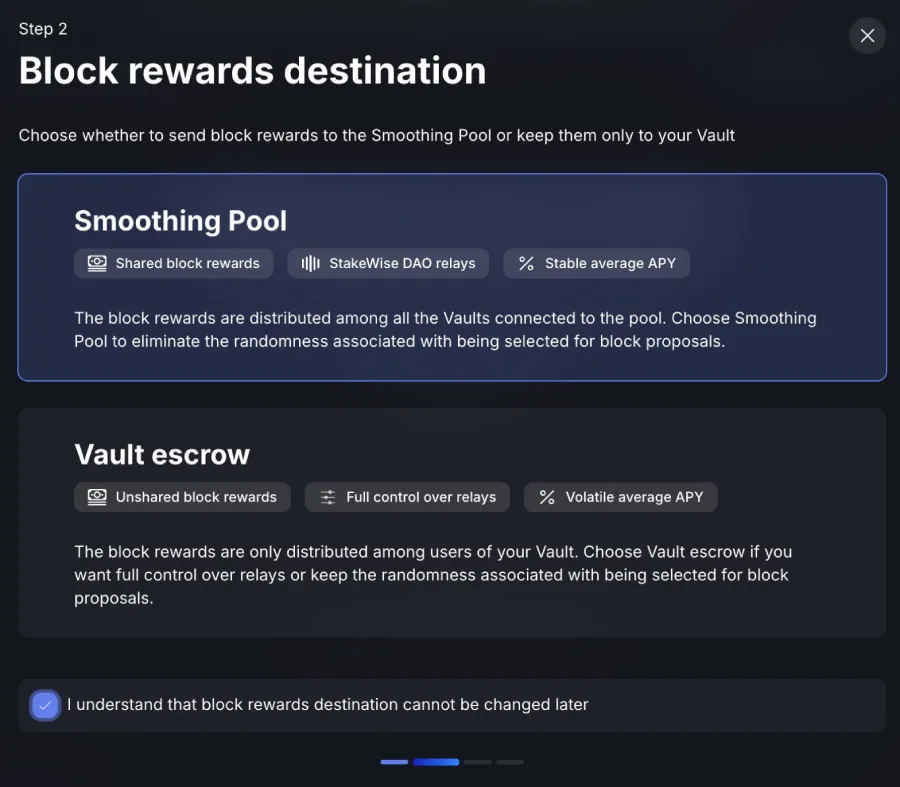
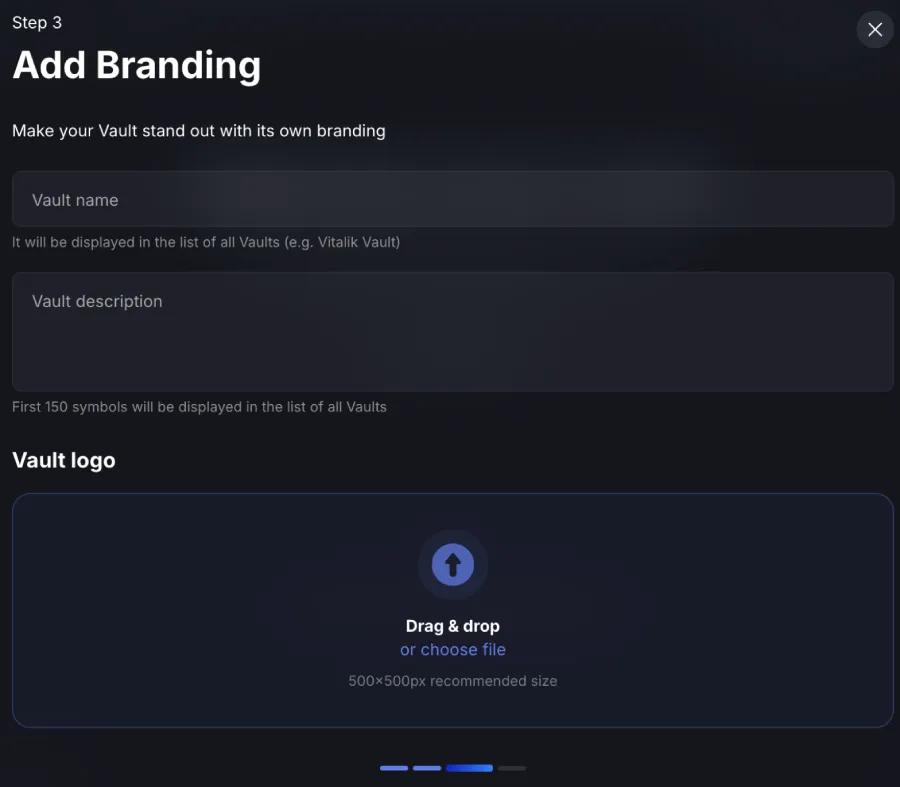 Click at image for full size
 - Once vault is deployed go to its page.
You will need the vault address. Vault address can be found either in the URL bar or in the "Contract address" field in "Details" section at the bottom of the page. This Vault contract address will be used as the withdrawal address for validator keystores.
StakeWise Vault address: (lowercased) Prepare validators keystores, deposit data file and wallet for StakeWise
gno-stakewise-operatorserviceIn order to run Operator Service, you must create keystores and deposit data file for your Vault's validators, and set up a hot wallet for Operator Service to handle validator registrations.
Operator Service has in-built functionality to generate all of the above. If needed, you can check also original guide at https://docs.stakewise.io/for-operators/operator-service.
Preparation for offline generation
For security reasons, it is recommended to perform configuration and generation strictly offline.
- Download latest StakeWise Operator client
- On an online machine, download the latest stable version of StakeWise Operator client from StakeWise github page https://github.com/stakewise/v3-operator/releases. Choose a version of the client for operating system you use on the offline machine.
- Unwrap the downloaded client and move it using USB stick to your offline machine.
- Download latest StakeWise Operator client
Offline generation
On offline PC, unsing the StakeWise operator client, process the operations below:Generate a config.json file
Example process & output./stakewise-operator init --data-dir ./Enter the network name (mainnet, holesky) [mainnet]: Enter your vault address: 0xXXXX... Choose your mnemonic language (chinese_simplified, chinese_traditional, czech, english, italian, korean, portuguese, spanish) [english]: This is your seed phrase. Write it down and store it safely, it is the ONLY way to recover your validator keys. pumpkin anxiety private salon inquiry .... Press any key when you have written down your mnemonic. Please type your mnemonic (separated by spaces) to confirm you have written it down : pumpkin anxiety private salon inquiry .... done. Successfully initialized configuration for vault 0xXXXX...The Output is
config.jsonfile that keepsmnemonic_next_indexvalue that is used for generating next keystores above the same seed.Generate validator keys
Example process & output./stakewise-operator create-keys --data-dir ./Enter the vault address: 0xXXXX... Enter the number of the validator keys to generate: 10 Enter the mnemonic for generating the validator keys: pumpkin anxiety private salon inquiry .... Creating validator keys: [####################################] 10/10 Generating deposit data JSON [####################################] 10/10 Exporting validator keystores [####################################] 10/10 Done. Generated 10 keys for 0xXXXX... vault. Keystores saved to ./0xXXXX.../keystores file Deposit data saved to ./0xXXXX.../keystores/deposit_data.json fileEncryption password for keys generation was generated and used automatically and can be found at
./0xXXXX.../keystores/password.txtfile.Create Hot wallet
Run the
create-walletcommand below to create hot wallet using your mnemonic (note, this mnemonic can be the same as the one used to generate the validator keys, or a new mnemonic if you desire).
Example process & output./stakewise-operator create-wallet --data-dir ./Enter the vault address: 0xXXXX... Enter the mnemonic for generating the wallet: pumpkin anxiety private salon inquiry ... Done. The wallet and password saved to ./0xXXXX.../wallet directory. The wallet address is: 0x239B...e3CcWithin a
./0xXXXX.../walletdirectory, there are 2 files now:wallet.jsonandpassword.txt.Note, you must send some xDAI to the wallet for gas expenses. You must keep an eye on your wallet balance, otherwise validators will stop registering if the balance falls too low.
-
Moving StakeWise configuration to staking node
Removing
For security reason, you can write content of following password files on the paper and then remove the passwords from the file.password.txtfiles for security reasonkeystores/password.txtwallet/password.txt
- Copy
0xXXXX...directory from offline PC to your USB stick - Copy
0xXXXX...directory from your USB stick to staking node. You can usescpprotocol for remote transfer
Use your preferred methods of generating keystores and deposit data file, such as via Wagyu Keygen, and your preferred tool for generating the hot wallet, such as MetaMask.
- On offline PC, generate deposit keys with the Vault withdrawal's address. See a keystore guide.
- Create Hot wallet...
-
Set
Validators managerrole to the operation Wallet addressOpen Your StakeWise Vault in browser, go to settings → tab Roles, and attach the created operator wallet address to
Validators manager. -
Create a
StakeWise operatorserviceCreate a node operator system service for running StakeWise validators and register keystores into it.
- StakeWise instance (node operator) service name:
-
Create a service user for StakeWise Operator
sudo useradd --system --no-create-home --shell /bin/false gno-stakewise-operator Create a directory for StakeWise operation configuration data
sudo mkdir -p /srv/stakewise/gnosis- Copy your offline-generated
0xXXXX...folder to this directory to make the Vault data files available at/srv/stakewise/gnosis/0xXXXX... - Do not forget to add correct passwords to the
passowrd.txtfiles, if you removed them for the transfersudo nano /srv/stakewise/gnosis/0xXXXX.../keystores/password.txtsudo nano /srv/stakewise/gnosis/0xXXXX.../wallet/password.txt
- Set directory ownership
sudo chown -R gno-stakewise-operator:gno-stakewise-operator /srv/stakewise/gnosis/0xXXXX... - Set Read only by owner permission at the password files
sudo chmod 400 /srv/stakewise/gnosis/0xXXXX.../keystores/password.txtsudo chmod 400 /srv/stakewise/gnosis/0xXXXX.../wallet/password.txt
- Copy your offline-generated
Create a directory for StakeWise operation database
Set directory ownershipsudo mkdir -p /var/lib/gnosis/stakewise/0xXXXX...sudo chown -R gno-stakewise-operator:gno-stakewise-operator /var/lib/gnosis/stakewise/0xXXXX...-
Configurate the
gno-stakewise-operatorservicesudo nano /etc/systemd/system/gno-stakewise-operator.service[Unit] Description=Stakewise operator service (Gnosis network) After=network.target Wants=network.target [Service] User=gno-stakewise-operator Group=gno-stakewise-operator Type=simple Restart=always RestartSec=5 ExecStart=/usr/local/bin/stakewise-operator start \ --vault 0xXXXX... \ --data-dir /srv/stakewise/gnosis \ --database-dir /var/lib/gnosis/stakewise/0xXXXX... \ --consensus-endpoints http://127.0.0.1:5052 \ --execution-endpoints http://127.0.0.1:8545 \ --wallet-file /srv/stakewise/gnosis/0xXXXX.../wallet/wallet.json \ --wallet-password-file /srv/stakewise/gnosis/0xXXXX.../wallet/password.txt \ --keystores-dir /srv/stakewise/gnosis/0xXXXX.../keystores \ --keystores-password-file /srv/stakewise/gnosis/0xXXXX.../keystores/password.txt [Install] WantedBy=default.targetReload deamon
sudo systemctl daemon-reload
-
Start the node operator service
sudo systemctl start gno-stakewise-operator && systemctl status gno-stakewise-operatorCheck the service
systemctl status gno-stakewise-operatorMonitor the service
journalctl -f -u gno-stakewise-operatorOutput:
2025-11-03 16:45:29 INFO     Starting operator service, version v4.1.10
INFO     Checking connection to database...
INFO     Connected to database /var/lib/gno-stakewise/0xXXXX.../operator.db.
INFO     Checking connection to consensus nodes...
INFO     Connected to consensus node at http://127.0.0.1:9596. Finalized epoch: 1038841
INFO     Checking connection to execution nodes...
INFO     Connected to execution node at http://127.0.0.1:8545. Current block number: 35182233
INFO     Checking consensus nodes network...
INFO     Checking execution nodes network...
INFO     Checking oracles config...
INFO     Checking vault address 0xXXXX...
INFO     Vault withdrawable assets: 0.00 GNO
INFO     Checking wallet balance 0xXXXX... ...
INFO     Checking connection to ipfs nodes...

INFO     Connected to ipfs nodes at https://gno-stakewise-v3.infura-ipfs.io, http://cloudflare-ipfs.com, https://gateway.pinata.cloud, https://ipfs.io.
INFO     Checking connection to oracles set...
INFO     Connected to oracles at https://gno-stakewise-v3-oracle.pn.prod.fcstech.de, https://gnosis-oracle.stakewise.io, https://stakewise-oracle-gnosis.chorus.one, https://stakewise-oracle-gno-mainnet-1.gateway.fm, https://sw-oracle-gno.axol.io, https://stakewise-oracle-gc.gnosischain.com, https://gnosis-oracle.stakewise.dsrvlabs.net, https://gnosis-oracle-b.stakewise.io, https://stakewise-oracle-v3-gnosis.bitfly.at, https://stakewise-oracle-gc-2.gnosischain.com, https://stakewise-oracle-gnosis.senseinode.com
INFO     Checking keystores dir...
INFO     Found keystores dir
INFO     Loading keys from /srv/gno-stakewise/0xXXXX.../keystores...
INFO     Loaded XY keys
INFO     Loaded deposit data file /srv/gno-stakewise/0xXXXX.../deposit_data.json
INFO     Syncing network validator events...
INFO     Updating oracles cache...
INFO     Started operator service
Enable auto launch on OS startup
sudo systemctl enable gno-stakewise-operatorExtend Staking manager clients.conf
Insertgno-stakewise-operatorinto clients.conf file, sectionstakewiseOperators, that is used by Staking Manager.sudo nano /usr/local/etc/staking/config/clients.conf-
Activate service to start automatically on OS startup
- Open Start with delay util
sudo nano /usr/local/bin/delayed-start.sh - Place or uncomment a command to start the Beacon client(s)
/usr/local/bin/staking.sh start stakewise - Verify, that a service `delayed-start.service` exists and is automatically launched on system start.
sudo systemctl enable delayed-start.service
- Open Start with delay util
Configurate & Run Validator instance performing validation duties
-
Do you want to create a new validation instance or extend exisiting instance for more validators?
Create a directory for validator instance data
sudo mkdir -p /var/lib/gnosis/lighthouse/vi1-
Load keystores to
:/var/lib/gnosis/lighthouse/vi1sudo /usr/local/bin/lighthouse --network gnosis account validator import --reuse-password --directory $HOME/keystores/ddk_i1 --datadir /var/lib/gnosis/lighthouse/vi1- Insert keystores encryption password (the one used during keystores generation) on request
- If there are keystores with different encryption password, repeat the process for each encryption password
Create a service user for the validator instance
sudo useradd --system --no-create-home --shell /bin/false gno-lighthouse-vi1Set ownership of
/var/lib/gnosis/lighthouse/vi1tovalidators-i1usersudo chown -R gno-lighthouse-vi1:gno-lighthouse-vi1 /var/lib/gnosis/lighthouse/vi1Create configuration service file for
gno-lighthouse-vi1service-
Open the configuration file
sudo nano /etc/systemd/system/gno-lighthouse-vi1.service -
Copy the configuration below into the file.
[Unit] Description=Lighthouse Validator Instance (Gnosis Network) Wants=network-online.target After=network-online.target [Service] User=gno-lighthouse-vi1 Group=gno-lighthouse-vi1 Type=simple Restart=always RestartSec=5 ExecStart=/usr/local/bin/lighthouse vc \ --network gnosis \ --datadir /var/lib/gnosis/lighthouse/vi1 \ --suggested-fee-recipient 0xXXXXXXXXXXXXXXXX \ --beacon-nodes http://localhost:5052 \ --graffiti "Nethermind+Lighthouse" [Install] WantedBy=multi-user.target -
Press
CTRL+XthenYthenENTERto save and exit the config file.
-
Stop running validator instance
gno-lighthouse-vi1sudo systemctl stop gno-lighthouse-vi1Extend
/var/lib/gnosis/lighthouse/vi1for new keystoressudo /usr/local/bin/lighthouse --network gnosis account validator import --reuse-password --directory $HOME/keystores/ddk_i1 --datadir /var/lib/gnosis/lighthouse/vi1- You will be requested to insert keystores encryption password (the one used during keystores generation)
- If there are keystores with different encryption password, repeat the process for each encryption password
- Already existing keystores in the directory will be skipped
-
Load processed changes to the system
sudo systemctl daemon-reload -
Start the validator instance
sudo systemctl start gno-lighthouse-vi1 -
Check the running validator instance
systemctl status gno-lighthouse-vi1journalctl -fu gno-lighthouse-vi1 -
Activate service to start automatically on system startup
sudo systemctl enable gno-lighthouse-vi1- Open Delayed Start shell
sudo nano /usr/local/bin/delayed-start.shConfigurate service start inside it
systemctl start gno-lighthouse-vi1.service - Be sure,
delayed-start.serviceservice controllingdelayed-start.shis enabled for auto start with system startupsudo systemctl enable delayed-start.service
Configurate Staking Manager util
- Open the configuration file
sudo nano /usr/local/etc/staking/config/clients.confIf the file is empty, generate it with command
sudo /usr/local/bin/staking.sh init - Set link to proper service. It should be as follow:
validatorServices="gno-lighthouse-vi1"If you place more services to the category, separate them with a space, see
validatorServices="service1 service2 service3 ..."
- Open the configuration file
-
Activate service to start automatically on OS startup
- Open Start with delay util
sudo nano /usr/local/bin/delayed-start.sh - Place or uncomment a command to start the validator client(s)
/usr/local/bin/staking.sh start validators - Verify, that a service `
delayed-start.service` exists and is automatically launched on system start.sudo systemctl enable delayed-start.service
- Open Start with delay util
- Open Delayed Start shell
Guide to exit validator is available at https://stakers.space/lighthouse/exit-validator.
-
Do you want to create a new validation instance or extend exisiting instance for more validators?
Create a directory for validator instance data
sudo mkdir -p /var/lib/gnosis/lodestar/vi1Enable accessing
/var/lib/gnosis/lodestar/vi1for server usermyserverusersudo chown -R myserveruser:myserveruser /var/lib/gnosis/lodestar/vi1Load keystores to
:/var/lib/gnosis/lodestar/vi1Move to Lodestar client directory
cd /usr/local/bin/lodestar./lodestar validator import --network gnosis --importKeystores $HOME/keystores/ddk_i1 --dataDir /var/lib/gnosis/lodestar/vi1- Insert keystores encryption password (the one used during keystores generation) on request
- If there are keystores with different encryption password, repeat the process for each encryption password
Create a service user for the validator instance
sudo useradd --system --no-create-home --shell /bin/false gno-lodestar-vi1Set ownership of
/var/lib/gnosis/lodestar/vi1tolodestar-vi1usersudo chown -R gno-lodestar-vi1:gno-lodestar-vi1 /var/lib/gnosis/lodestar/vi1Enable access to
:NodeJsfor userlodestar-vi1sudo usermod -aG nodejsusr gno-lodestar-vi1Create configuration service file for
gno-lodestar-vi1service-
Open the configuration file
sudo nano /etc/systemd/system/gno-lodestar-vi1.service -
Copy the configuration below into the file.
:
This can be get with commandnode -v
[Unit]
Description=Lodestar Validator Instance (Gnosis Network)
Wants=network-online.target
After=network-online.target
[Service]
User=gno-lodestar-vi1
Group=gno-lodestar-vi1
Type=simple
Restart=always
RestartSec=5
WorkingDirectory=/usr/local/bin/lodestar
Environment="PATH=/home/nodejsusr/.nvm/versions/node/v/bin:/usr/local/sbin:/usr/local/bin:/usr/sbin:/usr/bin:/sbin:/bin"
ExecStart=/usr/local/bin/lodestar/lodestar validator \
  --network gnosis \
  --dataDir /var/lib/gnosis/lodestar/validators/i1 \
  --suggestedFeeRecipient 0xXXXXXXXXXXXXXXXX \
  --beaconNodes http://127.0.0.1:9596 \
  --force \
  --graffiti "Nethermind+Lodestar"
[Install]
WantedBy=multi-user.target
Notes
-
Press
CTRL+XthenYthenENTERto save and exit the config file.
-
Adding validator instance to staking services manager
If you use a staking manager client, add the new instance into it.
Stop running validator instance
gno-lodestar-vi1sudo systemctl stop gno-lodestar-vi1Extend
/var/lib/gnosis/lodestar/validators/i1for new keystores./lodestar validator import --network gnosis --importKeystores $HOME/keystores/ddk_i1 --dataDir /var/lib/gnosis/lodestar/vi1- You will be requested to insert keystores encryption password (the one used during keystores generation)
- If there are keystores with different encryption password, repeat the process for each encryption password
- Already existing keystores in the directory will be skipped
Load processed changes to the system
sudo systemctl daemon-reloadStart the validator instance
sudo systemctl start gno-lodestar-vi1Check the running validator instance
systemctl status gno-lodestar-vi1journalctl -fu gno-lodestar-vi1-
Other configurations
Activate service to start automatically on OS startup
sudo systemctl enable gno-lodestar-vi1- Open Delayed Start shell
sudo nano /usr/local/bin/delayed-start.shConfigurate service start inside it
systemctl start gno-lodestar-vi1.service - Be sure,
delayed-start.serviceservice controllingdelayed-start.shis enabled for auto start with system startupsudo systemctl enable delayed-start.service
Configurate Staking Manager util
- Open the configuration file
sudo nano /usr/local/etc/staking/config/clients.confIf the file is empty, generate it with command
sudo /usr/local/bin/staking.sh init - Set link to proper service. It should be as follow:
validatorServices="gno-lodestar-vi1"If you place more services to the category, separate them with a space, see
validatorServices="service1 service2 service3 ..."
- Open the configuration file
-
Activate service to start automatically on OS startup
- Open Start with delay util
sudo nano /usr/local/bin/delayed-start.sh - Place or uncomment a command to start the validator client(s)
/usr/local/bin/staking.sh start validators - Verify, that a service `
delayed-start.service` exists and is automatically launched on system start.sudo systemctl enable delayed-start.service
- Open Start with delay util
Configurate Lodestar validator Log monitor service
Log monitor service monitors the service log and process defined action (fixes) in a case of any issue detected.
- Check, whether the logmonitor util is installed:
/usr/local/bin/logmonitor.sh versionIf the util is not installed, install Lodestar validator Log monitor from GitHub.
- Check defined Errors list for lodestarvalidator service
sudo nano /usr/local/etc/lodestarvalidator_tracking_records.txtIf not available, download it from GitHub. You can also modifiy it, if needed.
- Configurate the validator log monitor for service
gno-lodestar-vi1, see guide on Github. - Place validator logmonitor service into
/usr/local/bin/delayed-start.shutil to start it automatically on system startup- Open
delayed-start.shsudo nano /usr/local/bin/delayed-start.sh - Place validator logmonitor service into the file
systemctl start gno-lodestar-vi1_logmonitor
- Open
- Open Delayed Start shell
Guide to exit validator is available at https://stakers.space/lodestar/exit-validator.
-
Do you want to create a new validation instance or extend exisiting instance for more validators?
Create a directory for validator instance data
sudo mkdir -p /var/lib/gnosis/teku/vi1If exists, remove
:deposit_datafile from keystores folder- Display files in the directory
cd $HOME/keystores/ddk_i1 && ls -lh - If there is
deposit_data-XXX....jsonfile, remove itsudo rm deposit_data-XXX....json
- Display files in the directory
Copy keystores dedicated for instance
into/var/lib/gnosis/teku/vi1/keystoresfoldersudo mkdir /var/lib/gnosis/teku/vi1/keystoressudo cp -a $HOME/keystores/ddk_i1/* /var/lib/gnosis/teku/vi1/keystores && cd /var/lib/gnosis/teku/vi1/keystoresTeku requires a
.txtfile with encryption password for each.jsonvalidator file.-
Display all keystores in the directory
ls -lh -
.json
Create a new
.txtfile for thekeystore-m_12381_3600_X_0_0-XXXXXXXXXX.json keystore filesudo nano keystore-m_12381_3600_X_0_0-XXXXXXXXXX.txtInsert an encryption password for the validator key (the one used during keystores generation) into that file.
Press
ctrl+x, thenyto save and exit - Set readonly permission for that file
sudo chmod 400 keystore-m_12381_3600_X_0_0-XXXXXXXXXX.txt
Now, you can either repeate the process for all other keystores in the folder, or use an automated solution to duplicate the created password file (with modified name) for all remaining keystores, see Shell Script to generate password files for Teku.
With automated process, to generate
.txtfile with a content of/var/lib/gnosis/teku/vi1/keystores/keystore-m_12381_3600_X_0_0-XXXXXXXXXX.txtfor all remaining keystores in the/var/lib/gnosis/teku/vi1/keystores/directory, use commandsudo /opt/teku-create-validator-psw-files.sh /var/lib/gnosis/teku/vi1/keystores/keystore-m_12381_3600_X_0_0-XXXXXXXXXX.txt-
Display all keystores in the directory
Create a service user for the validator instance
sudo useradd --system --no-create-home --shell /bin/false gno-teku-vi1- Set ownership of validator instance data directory to validator-instance user
sudo chown -R gno-teku-vi1:gno-teku-vi1 /var/lib/gnosis/teku/vi1 Create configuration service file for
gno-teku-vi1service- Open the configuration file
sudo nano /etc/systemd/system/gno-teku-vi1.service -
Copy the configuration below into the file.
Teku validator flags[Unit] Description=Teku Validator Instance (Gnosis Network) Wants=network-online.target After=network-online.target [Service] User=gno-teku-vi1 Group=gno-teku-vi1 Type=simple Restart=always RestartSec=5 Environment="JAVA_OPTS=-Xmx4g" Environment="TEKU_OPTS=-XX:-HeapDumpOnOutOfMemoryError" ExecStart=/usr/local/bin/teku/bin/teku validator-client \ --network gnosis \ --beacon-node-api-endpoint http://127.0.0.1:5051 \ #--beacon-node-api-endpoint http://127.0.0.1:5051,http://192.10.10.101:5051,http://192.140.110.44:5051 \ --data-path /var/lib/gnosis/teku/vi1 \ --validator-keys /var/lib/gnosis/teku/vi1/keystores:/var/lib/gnosis/teku/vi1/keystores \ --validators-proposer-default-fee-recipient 0xXXXXXXXXXXXXXXXX \ --validators-graffiti "Nethermind+Teku" [Install] WantedBy=multi-user.target
- Open the configuration file
Stop running validator instance
gno-teku-vi1sudo systemctl stop gno-teku-vi1If exists, remove
:deposit_datafile from keystores folder- Display files in the directory
cd $HOME/keystores/ddk_i1 && ls -lh - If there is
deposit_data-XXX....jsonfile, remove itrm deposit_data-XXX....json
- Display files in the directory
-
Copy keystores dedicated for instance
into/var/lib/gnosis/teku/vi1/keystoresfoldersudo mkdir /var/lib/gnosis/teku/vi1/keystoressudo cp -a $HOME/keystores/ddk_i1/* /var/lib/gnosis/teku/vi1/keystores/keystores && cd /var/lib/gnosis/teku/vi1/keystores Teku requires a
.txtfile with encryption password for each.jsonvalidator file.-
Display all keystores in the directory
ls -lh -
.json
Vreate a new
.txtfile for thekeystore-m_12381_3600_X_0_0-XXXXXXXXXX.json keystore filenano keystore-m_12381_3600_X_0_0-XXXXXXXXXX.txtInsert an encryption password for the validator key (the one used during keystores generation) into that file.
Press
ctrl+x, thenyto save and exit - Set readonly permission for that file
sudo chmod 400 keystore-m_12381_3600_X_0_0-XXXXXXXXXX.txt
Now, you can either repeate the process for all other keystores in the folder, or use an automated solution to duplicate the created password file (with modified name) for all remaining keystores, see Shell Script to generate password files for Teku.
With automated process, to generate
.txtfile with a content of/var/lib/gnosis/teku/vi1/keystores/keystore-m_12381_3600_X_0_0-XXXXXXXXXX.txtfor all remaining keystores in the/var/lib/gnosis/teku-vi1/keystores/directory, use command$HOME/bashscripts/create-teku-pswfiles.sh /var/lib/gnosis/teku/vi1/keystores/keystore-m_12381_3600_X_0_0-XXXXXXXXXX.txt-
Display all keystores in the directory
Load changes made in config files to the system
sudo systemctl daemon-reloadStart the validator instance
sudo systemctl start gno-teku-vi1Check the running validator instance
systemctl status gno-teku-vi1journalctl -fu gno-teku-vi1Activate service to start automatically
sudo systemctl enable gno-teku-vi1- Open Delayed Start shell
sudo nano /usr/local/bin/delayed-start.shAttach command to remove lock files (to prevent start the validator in a case of existing lock fiels after a power failure). This must be processed before starting the validator service.
/opt/remove-teku-validator-lock-files.sh '/var/lib/gnosis/teku/vi1/keystores'Configurate service start inside it
systemctl start gno-teku-vi1.service - Be sure,
delayed-start.serviceservice controllingdelayed-start.shis enabled for auto start with system startupsudo systemctl enable delayed-start.service
Configurate Staking Manager util
- Open the configuration file
sudo nano /usr/local/etc/staking/config/clients.confIf the file is empty, generate it with command
sudo /usr/local/bin/staking.sh init - Set link to proper service. It should be as follow:
validatorServices="gno-teku-vi1"If you place more services to the category, separate them with a space, see
validatorServices="service1 service2 service3 ..."
- Open the configuration file
-
Activate service to start automatically on OS startup
- Open Start with delay util
sudo nano /usr/local/bin/delayed-start.sh -
Attach command to remove lock files (to prevent start the validator in a case of existing lock fiels after a power failure). This must be processed before starting the validator service.
/opt/remove-teku-validator-lock-files.sh '/var/lib/gnosis/teku/vi1/keystores' - Place or uncomment a command to start the validator client(s)
/usr/local/bin/staking.sh start validators - Verify, that a service `
delayed-start.service` exists and is automatically launched on system start.sudo systemctl enable delayed-start.service
- Open Start with delay util
- Open Delayed Start shell
Guide to exit validator is available at https://stakers.space/teku/exit-validator.
-
Do you want to create a new validation instance or extend exisiting instance for more validators?
Create a directory for validator instance data
sudo mkdir -p /var/lib/gnosis/nimbus/vi1-
Load keystores to
:/var/lib/gnosis/nimbus/vi1sudo /usr/local/bin/nimbus-validator import data-dir=/var/lib/gnosis/nimbus/vi1 $HOME/keystores/ddk_i1NOTE: If you have used different passwords for each of your validators you will get an error. Run the process multiple times, providing each of the different passwords until they are all imported. Use the accounts list command to verify.
Create a service user for the validator instance
sudo useradd --system --no-create-home --shell /bin/false gno-nimbus-vi1Set ownership of
/var/lib/gnosis/nimbus/vi1tovalidators-i1usersudo chown -R gno-nimbus-vi1:gno-nimbus-vi1 /var/lib/gnosis/nimbus/vi1Create configuration service file for
gno-nimbus-vi1service-
Open the configuration file
sudo nano /etc/systemd/system/gno-nimbus-vi1.service -
Copy the configuration below into the file.
[Unit]
Description=Nimbus Validator Instance (Gnosis Network)
Wants=network-online.target
After=network-online.target
[Service]
User=gno-nimbus-vi1
Group=gno-nimbus-vi1
Type=simple
Restart=always
RestartSec=5
ExecStart=/usr/local/bin/nimbus/nimbus_validator_client \
  --network=gnosis \
  --data-dir=/var/lib/gnosis/nimbus/vi1 \
  --beacon-node=http://127.0.0.1:5052 \
  --suggested-fee-recipient=0xXXXXXXXXXXXXXXXX \
  --graffiti="Nethermind+Nimbus"

[Install]
WantedBy=multi-user.target
See more flags at https://nimbus.guide/options.html
-
Press
CTRL+XthenYthenENTERto save and exit the config file.
-
Stop running validator instance
gno-nimbus-vi1sudo systemctl stop gno-nimbus-vi1Extend
/var/lib/gnosis/nimbus/vi1for new keystoressudo /usr/local/bin/nimbus-validator import data-dir=/var/lib/gnosis/nimbus/vi1 $HOME/keystores/ddk_i1NOTE: If you have used different passwords for each of your validators you will get an error. Run the process multiple times, providing each of the different passwords until they are all imported. Use the accounts list command to verify.
-
Load processed changes to the system
sudo systemctl daemon-reload -
Start the validator instance
sudo systemctl start gno-nimbus-vi1 -
Check the running validator instance
systemctl status gno-nimbus-vi1journalctl -fu gno-nimbus-vi1 Activate service to start automatically
sudo systemctl enable gno-nimbus-vi1- Open Delayed Start shell
sudo nano /usr/local/bin/delayed-start.shConfigurate service start inside it
systemctl start gno-nimbus-vi1.service - Be sure,
delayed-start.serviceservice controllingdelayed-start.shis enabled for auto start with system startupsudo systemctl enable delayed-start.service
Configurate Staking Manager util
- Open the configuration file
sudo nano /usr/local/etc/staking/config/clients.confIf the file is empty, generate it with command
sudo /usr/local/bin/staking.sh init - Set link to proper service. It should be as follow:
validatorServices="gno-nimbus-vi1"If you place more services to the category, separate them with a space, see
validatorServices="service1 service2 service3 ..."
- Open the configuration file
-
Activate service to start automatically on OS startup
- Open Start with delay util
sudo nano /usr/local/bin/delayed-start.sh - Place or uncomment a command to start the validator client(s)
/usr/local/bin/staking.sh start validators - Verify, that a service `
delayed-start.service` exists and is automatically launched on system start.sudo systemctl enable delayed-start.service
- Open Start with delay util
- Open Delayed Start shell
Guide to exit validator is available at https://stakers.space/nimbus/exit-validator.
-
Do you want to create a new validation instance or extend exisiting instance for more validators?
Create a directory for validator instance data
sudo mkdir -p /var/lib/gnosis/prysm/vi1-
Load keystores to
: Gnosis chain is not supported by Prysm client/var/lib/gnosis/prysm/vi1- Accept Terms of Use
- Set a wallet password. This is different to the validator password you set during keys generation. Prysm will use this to decrypt the validator wallet. Back it up somewhere safe. You will need this later in this section and when configuring the validator.
- Provide the validator keys password. This is the password you set when you created the keys during keys generation
NOTE: If you have used different passwords for each of your validators you will get an error. Run the process multiple times, providing each of the different passwords until they are all imported. Use the accounts list command to verify.
Create a Wallet Password File
Create a file to store the wallet password so the Prysm validator service can access the wallet without you having to supply the password.
sudo nano /var/lib/gnosis/prysm/vi1/password.txtPress
CTRL+XthenYthenENTERto save and exit the config file.Create a service user for the validator instance
sudo useradd --system --no-create-home --shell /bin/false gno-prysm-vi1Set ownership of
/var/lib/gnosis/prysm/vi1tovalidators-i1usersudo chown -R gno-prysm-vi1:gno-prysm-vi1 /var/lib/gnosis/prysm/vi1Create configuration service file for
gno-prysm-vi1service-
Open the configuration file
sudo nano /etc/systemd/system/gno-prysm-vi1.service -
Copy the configuration below into the file.
Gnosis chain is not supported
-
Press
CTRL+XthenYthenENTERto save and exit the config file.
-
Stop running validator instance
gno-prysm-vi1sudo systemctl stop gno-prysm-vi1Extend
Gnosis chain is not supported by Prysm client/var/lib/gnosis/prysm/vi1for new keystores- Accept Terms of Use
- Set a wallet password. This is different to the validator password you set during keys generation. Prysm will use this to decrypt the validator wallet. Back it up somewhere safe. You will need this later in this section and when configuring the validator.
- Provide the validator keys password. This is the password you set when you created the keys during keys generation
NOTE: If you have used different passwords for each of your validators you will get an error. Run the process multiple times, providing each of the different passwords until they are all imported. Use the accounts list command to verify.
-
Load processed changes to the system
sudo systemctl daemon-reload -
Start the validator instance
sudo systemctl start gno-prysm-vi1 -
Check the running validator instance
systemctl status gno-prysm-vi1journalctl -fu gno-prysm-vi1 Activate service to start automatically
sudo systemctl enable gno-prysm-vi1- Open Delayed Start shell
sudo nano /usr/local/bin/delayed-start.shConfigurate service start inside it
systemctl start gno-prysm-vi1.service - Be sure,
delayed-start.serviceservice controllingdelayed-start.shis enabled for auto start with system startupsudo systemctl enable delayed-start.service
Configurate Staking Manager util
- Open the configuration file
sudo nano /usr/local/etc/staking/config/clients.confIf the file is empty, generate it with command
sudo /usr/local/bin/staking.sh init - Set link to proper service. It should be as follow:
validatorServices="gno-prysm-vi1"If you place more services to the category, separate them with a space, see
validatorServices="service1 service2 service3 ..."
- Open the configuration file
-
Activate service to start automatically on OS startup
- Open Start with delay util
sudo nano /usr/local/bin/delayed-start.sh - Place or uncomment a command to start the validator client(s)
/usr/local/bin/staking.sh start validators - Verify, that a service `
delayed-start.service` exists and is automatically launched on system start.sudo systemctl enable delayed-start.service
- Open Start with delay util
- Open Delayed Start shell
Guide to exit validator is available at https://stakers.space/prysm/exit-validator.
-
-
Upload deposit file to the 0xXXXX... vault
Once you have created your validator keys, deposit data file, and hot wallet, you need to upload the deposit data file to the Vault. This process connects your node to the Vault. Note, if there is more than one node operator in a Vault, you first need to merge all operator deposit data files into a single file (use the
./stakewise-operator merge-deposit-datacommand). Uploading the deposit data file can be achieved either through the StakeWise UI or via Operator Service and can only be done by the Vault Admin or Keys Manager.Upload the deposit data file either over the web StakeWise vault web UI or StakeWise operator service
- Connect with your wallet to StakeWise Operate webpage
- Select the Vault you want to upload the deposit data file to.
- In the upper right corner, click on "Settings" and open the "Deposit Data" tab. The "Settings" button is only visible to the Vault Admin or Keys Manager.
- Upload the deposit data file either by dragging and dropping the file, or clicking to choose the file via your file browser.
- Click Save and a transaction will be created to sign using your wallet. The Vault's deposit data file will be uploaded when the transaction is confirmed on the network.
You can calculate deposit data Merkle tree root with the following command:
Example process & outputsudo /usr/local/bin/stakewise-operator get-validators-root --data-dir /srv/gno-stakewiseEnter the vault address: 0xXXXX... The validator deposit data Merkle tree root: 0x504...26d7For other steps, check StakeWise guide, section Upload deposit data file to Vault, tab Operate Service.
Extend validators set for other validators
If there is allocated more GNO in the Vault deposit contract than a number of generated validator keys for the Vault contract, the operator informs about that with following message:
stakewise-operator: YYYY-MM-DD HH:MM:SS WARNING There are no available validators in the current deposit data to proceed with registration. To register additional validators, you must upload new deposit data.For option to register and launch other validators, you must do following:
- On Offline PC, generate more validator keys for the Vault
- On your staking node:
- Register the new keystores into a standard validator instance - either extend existing or create a new.
- Stop StakeWise Operator
- Copy the new validator keys to stakewise operator keystores directory
/srv/stakewise/gnosis/0xXXXX.../keystores - Replace the old depost-data.json file at
/srv/gno-stakewise/0xXXXX.../deposit_data.json. take into notice, that thedeposit_data.jsonfile must contain only keystores that were not deposited yet. - Start StakeWise Operator again
- As there is a different
deposit_data.jsonfile at your staking operator and on the Vault, you will see following log in the operator:ERROR Deposit data tree root and vault's validators root don't match. Have you updated vault deposit data? - Upload a new
deposit_data.jsonfile (same as on the operator) to the Stakevise Vault through Web UI. After that, operator should work properly again and pending GNO should be immediatelly allocated into newly registered validators.
Update
StakeWise documentation: https://docs.stakewise.io/
-
Updating StakeWise client
-
Find the latest stable version of StakeWise client on Github
- Find latest StakeWise version at https://github.com/stakewise/v3-operator/releases
- Write latest stable StakeWise version:
This will update the url links in the guide below.
-
Download the binary file for your node
What's you Ubuntu version?
cd ~/downloads && curl -LO https://github.com/stakewise/v3-operator/releases/download/v4.1.10/operator-v4.1.10-ubuntu-24.04-amd64.tar.gz -
Unpack the client and remove its packed file
tar xvf operator-v4.1.10-ubuntu-24.04-amd64.tar.gz && rm operator-v4.1.10-ubuntu-24.04-amd64.tar.gz -
Stop running StakeWise clients
Modify the service names to reflect your used names during StakeWise integrationsudo systemctl stop gno-stakewise-operator && systemctl status gno-stakewise-operator/usr/local/bin/staking.sh stop stakewise -
Remove the old client
sudo rm /usr/local/bin/stakewise-operator -
Move the client to
/usr/local/binsudo cp ~/downloads/operator-v4.1.10-ubuntu-24.04-amd64/operator /usr/local/bin/stakewise-operator -
Start the client again
Modify the service names to reflect your used names during StakeWise integrationsudo systemctl start gno-stakewise-operator && systemctl status gno-stakewise-operator/usr/local/bin/staking.sh start stakewise -
Monitor
Modify the service names to reflect your used names during StakeWise integrationjournalctl -f -u gno-stakewise-operator/usr/local/bin/staking.sh monitor stakewise -
Remove downloaded files
rm -r ~/downloads/operator-v4.1.10-ubuntu-24.04-amd64
-
Regular maintenance
As a regular member securying the network and processing blockchain operations on it, you need to keep your software up to date to avoid penalties and earning rewards for the work.
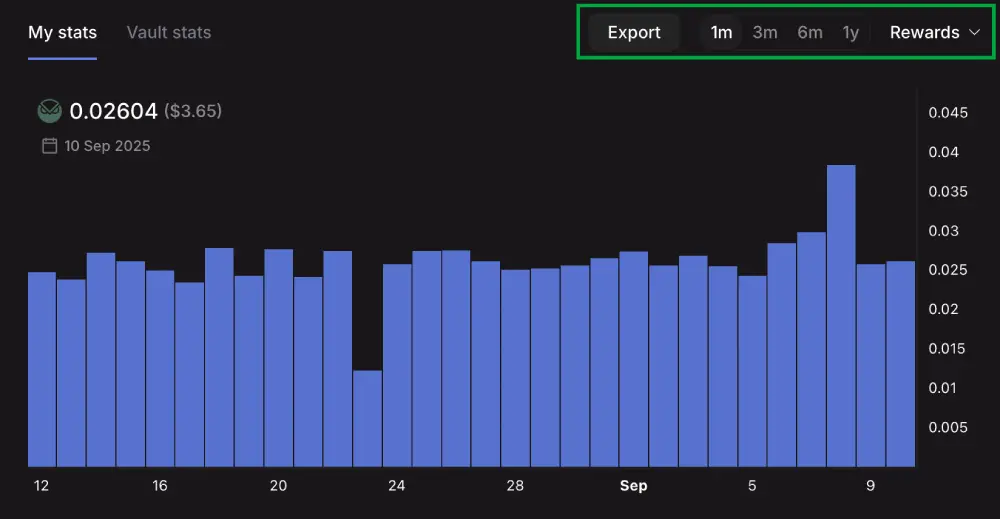
Guides for regular maintenanceTax matter
If you do not emmit a liquid token against your stake, your tokens are simply locked in the contract. Your Rewards are visible right in the StakeWise dashboard, including an option to export that in .csv (Excel) format, see below:
Withdrawals
If any client process a withdrawal through the StakeWise page, StakeWise operator service triggers an exit a required number of validators to unlock tokens to cover the withdrawal request. The client must wait certain time till his tokens become unlocked and available for clain through the StakeWise webpage.